Widerstandsnest 72: The Omaha Beach Stronghold
Between the Allied invasion force of Operation Overlord and a foothold in continental Europe was the Atlantic Wall, a massive defensive fortification that stretched from the Arctic Ocean to Spain. At Omaha Beach, the fortifications behind the beach obstacles consisted of 15 “resistance nests” or Widerstandsnestern (WN), numbered 60 through 74.
At Omaha, the Rangers disembarked from their LCVPs and faced the defenses surrounding the D-1 Exit, the most fortified section of Omaha Beach. On the eastern side of the Vierville Valley was WN 71. On the western side, WN 72, and on the cliffs further west, WN 73.
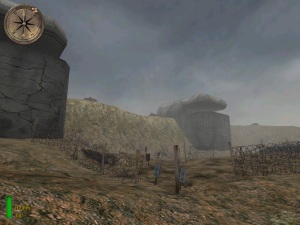
From the location of the valley in Allied Assault, the picture above appears to be on the western side, meaning that the game’s Rangers and their fictional Lt. Mike Powell must be assaulting WN 72 or WN 73. Since WN 72 was the best-constructed stronghold at Omaha, and WN 73 was a small strongpoint, I’m going to assume that Powell took on the former, or, perhaps, a combination of the two.
WN 72 consisted of two bunkers connected by trenches, as well as two Tobruk bunkers and other machine gun positions. Tobruks get their name from the city of Tobruk, where this type of fortification was used for the first time. They were originally merely a fuel drum buried in the ground – meant for one soldier with a machine gun) but they eventually evolved into concrete structures for machine gun and mortar emplacements. Finally, an anti-tank wall blocked the road off the beach, and everything was surrounded by minefields and barbed wire.
Let’s take a look at the similarities. The MOH: AA fortifications are made up of two large concrete bunkers, one of which has a trench that extends out to a single smaller bunker (though the multiplayer map has two of these and connects everything with trenches). The ground between the shingle and the bluff is covered with barbed wire and mines and every inch can be seen by MG42 positions at the top of the cliff.
However, that’s where the similarities, and historical accuracy, end. First of all, the landscape surrounding the real WN 72 was not as imposing. The two bunkers were not too far above sea level and were almost directly in front of the road leading to Vierville-sur-Mer, between the bluffs, not on top of them. Also, the small bunkers look less like Tobruks and more like observation posts. Additionally, while WN 73 was above the beach, it was nowhere near as massive as the in-game strongpoint.
According to John Flaherty of Hand Maid Tours in Normandy, the Allied Assault bunkers most resemble those seen in Saving Private Ryan (given that most of this mission is nearly the same as the first scene in the movie, it’s to be expected), and this type of bunker was constructed at WN 65.

A photo of the landscape surrounding WN 72 today, with key positions labeled. This photo was taken from a helicopter by John Flaherty of Hand Maid Tours in Normandy.
Furthermore, both resistance nests were on the westernmost end of Omaha Beach. Probably due to the impassable cliffs to the west, all three bunkers faced east, where they could cover the whole beach. The 50mm gun in the second bunker could also face west, if necessary. Coupled with the guns firing from Pointe du Hoc and other locations, as well as shelling from unseen mortars on top of the cliff at WN 73, the men on the beach were taking fire from all sides.
In the game, the assault force is only fired upon from the front – from four MG42s in the bunkers and two on the cliff between. But, there is also consistent shelling – either from mortars or more distant guns. It’s also unlikely that the Germans would’ve constructed these vital defenses with large openings facing directly out to sea. By doing so, they’d be risking the bunker’s immediate destruction from a well-placed naval shell. In actuality, thick concrete walls faced the sea, serving to protect the men inside from a direct hit from an Allied ship.

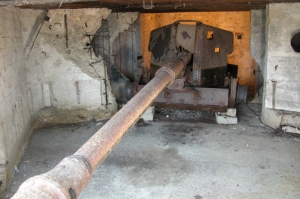
This is how the 8.8cm gun in WN 72 looks today. Photo courtesy of John Flaherty of Hand Maid Tours in Normandy.
The Germans firing down from the bluffs at Lt. Powell are only operating six MG42s (seven if the one in the tunnel is included in the count). Once inside the bunker, the sound of heavy guns firing can be heard, but none are ever seen. At WN 72, the main bunker housed an 8.8cm gun, complemented by the 50mm mentioned earlier. Up the hill at WN 73, a 7.5cm gun fired down on the beach. None of these weapons are visible during the single-player mission (except for perhaps this brief glimpse), though artillery pieces can be found on the multiplayer map.
Today, the National Guard Monument sits on top of the bunker that housed the 8.8cm gun, recognizing the U.S. National Guardsmen who stormed the beaches on D-Day. The gun that once fired on Allied troops is still in its position, though it has been pushed back in the casement. Much of the Atlantic wall has been destroyed by the climate and other factors, but some of it still remains, and if a trip to Normandy isn’t in your budget, you can always take a virtual tour via Google Maps Street View!


